Getting started 3D Printing for a developer

Over the past 20 years, I have on numerous occasions grabbed the latest demo copy (for some definition of “demo”) of AutoCAD or SolidWorks and sat down with it, determined to learn how to make things. For many years I have been aware of various CAM packages designed to help turn 3D models into tool paths for CNC machines, and more recently slicing software for turning 3D models into printable models. It seemed to me that a person could go out and buy a CNC mill or lathe and the requisite accessories, one could go buy CAM software, and then one could start making parts. Sure, you would probably send quite a bit of raw material and tooling to the recycler along the way in a teach-yourself-machining scenario, but you could start building stuff — especially simple things — almost immediately. Except…  well, you needed a 3D model at the start of the whole process. The more you know the more you realize you don’t know. Obviously the “if I have a 3D model I can run!” concept is a gross oversimplification of every step, and disregards what one could spend an entire lifetime becoming really good at. When I first started thinking along these lines I was a teenager, optimistic and all-knowing.

AutoCAD 2004 For Dummies

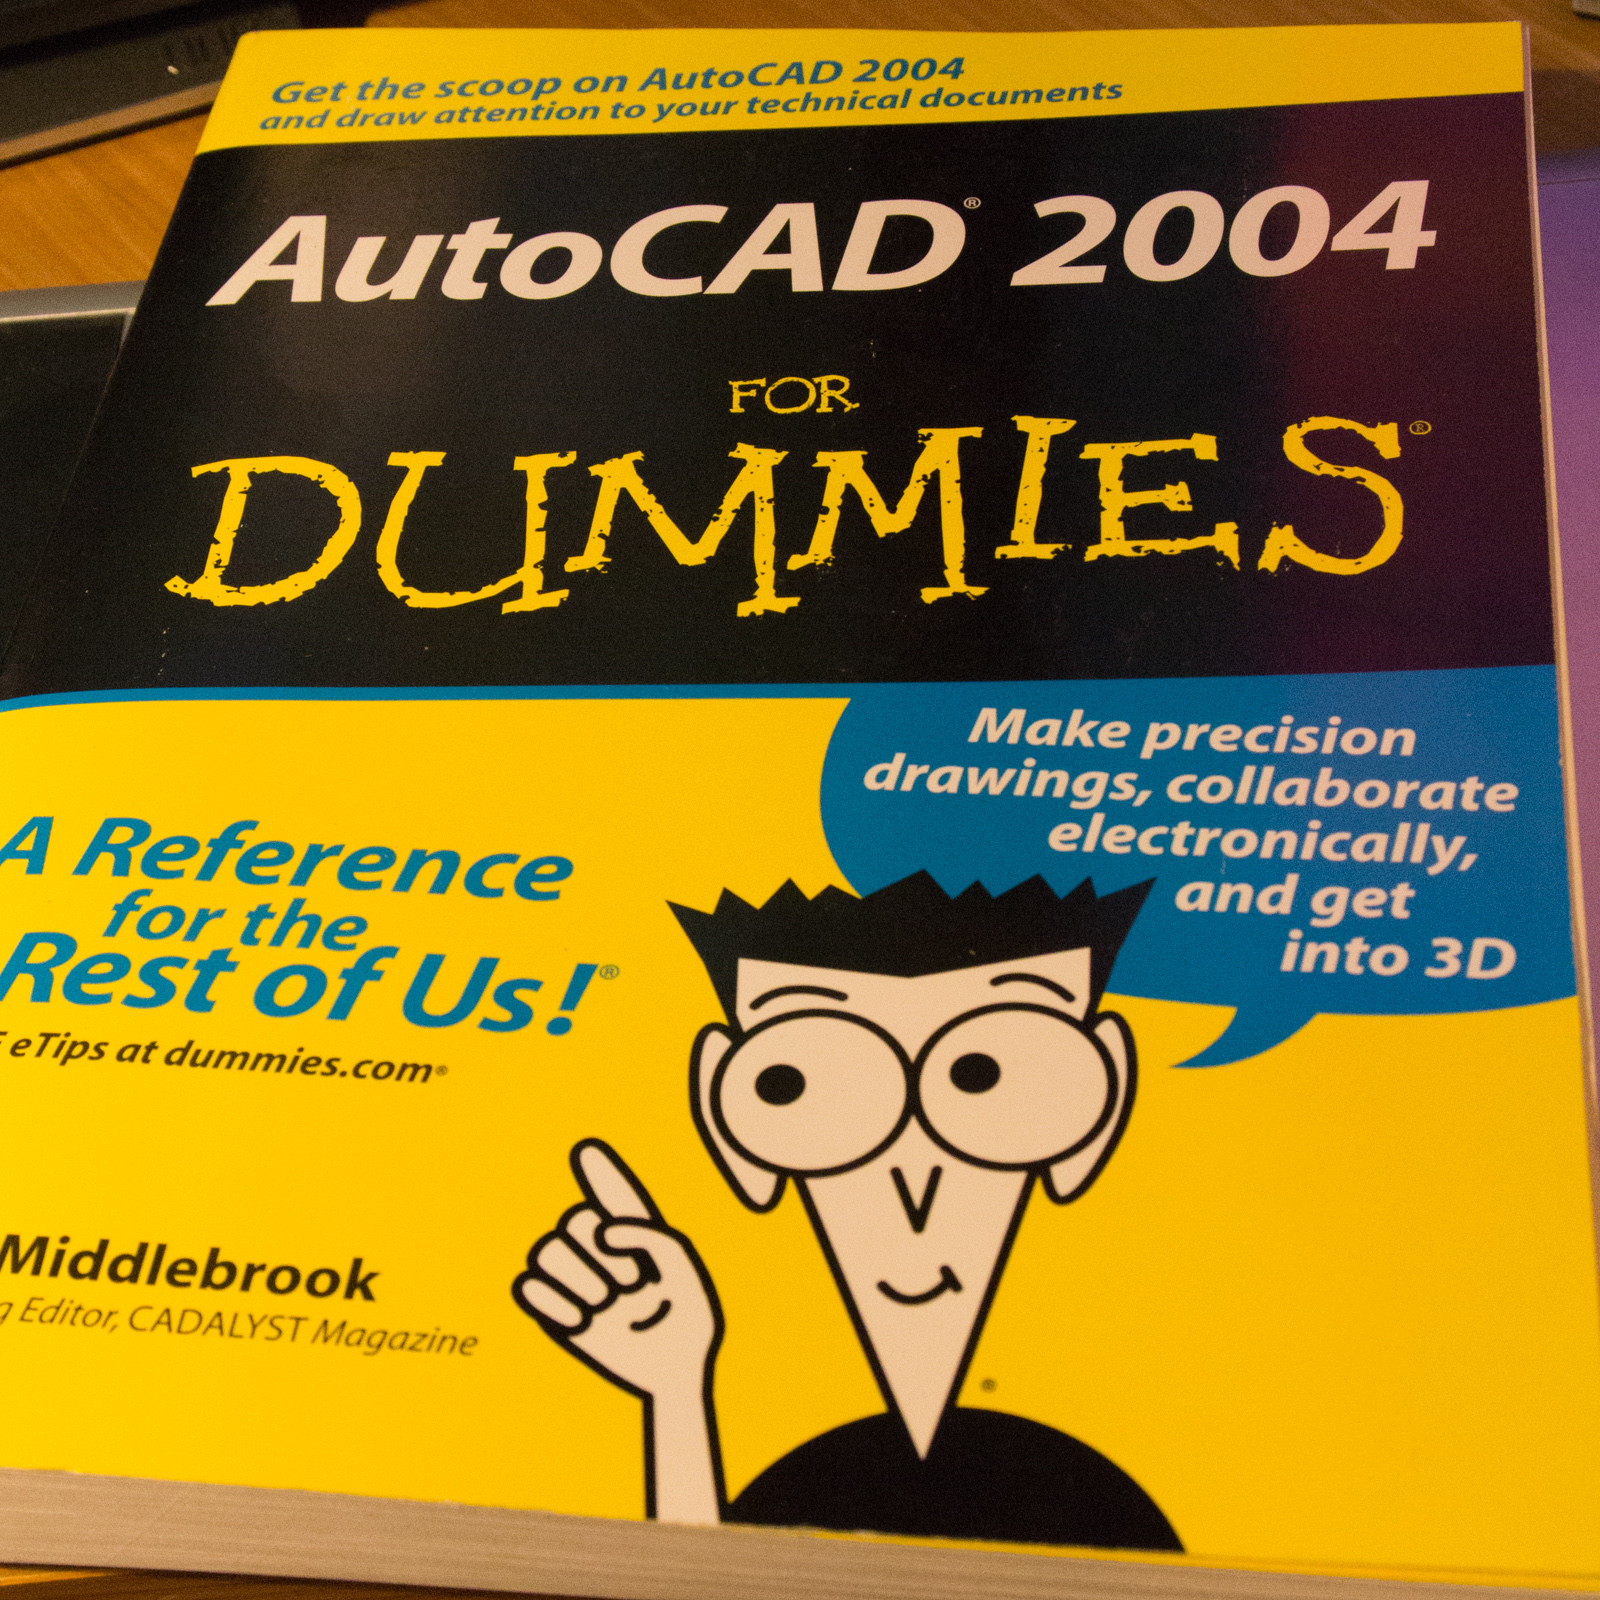
At some point, this gem made it into my collection and has faithfully gathered dust next to a slew of programming reference manuals. The “For Dummies” book that I wasted $24.99 on at Borders in Rapid City, SD as a 21-year-old provided as evidence that when I say I have been wanting to CAD for 20 years — I’m not completely full of shit. Just mostly. There’s a point here: it DOES start with a model. You can prototype 1-off things by hand all day, but if you want the benefit of computer aided manufacture, whether you are adding material or subtracting it, you need to be able to model the resulting part. Your model may look a bit different based on the manufacturing method, but it sure as heck won’t look at all if you can’t build it. So this is the hard part, the mental gap, the crux.

It’s a whole new world now. When I buy reference manuals I find I don’t actually have time to read them cover to cover and absorb the knowledge, just use them for reference.  I’m busy doing stuff, paying bills, being an adult. When did that happen? So I know myself well enough to know that if I want to learn something new, and fit it in, buying a book doesn’t cut it, I need a practical project to apply it to.

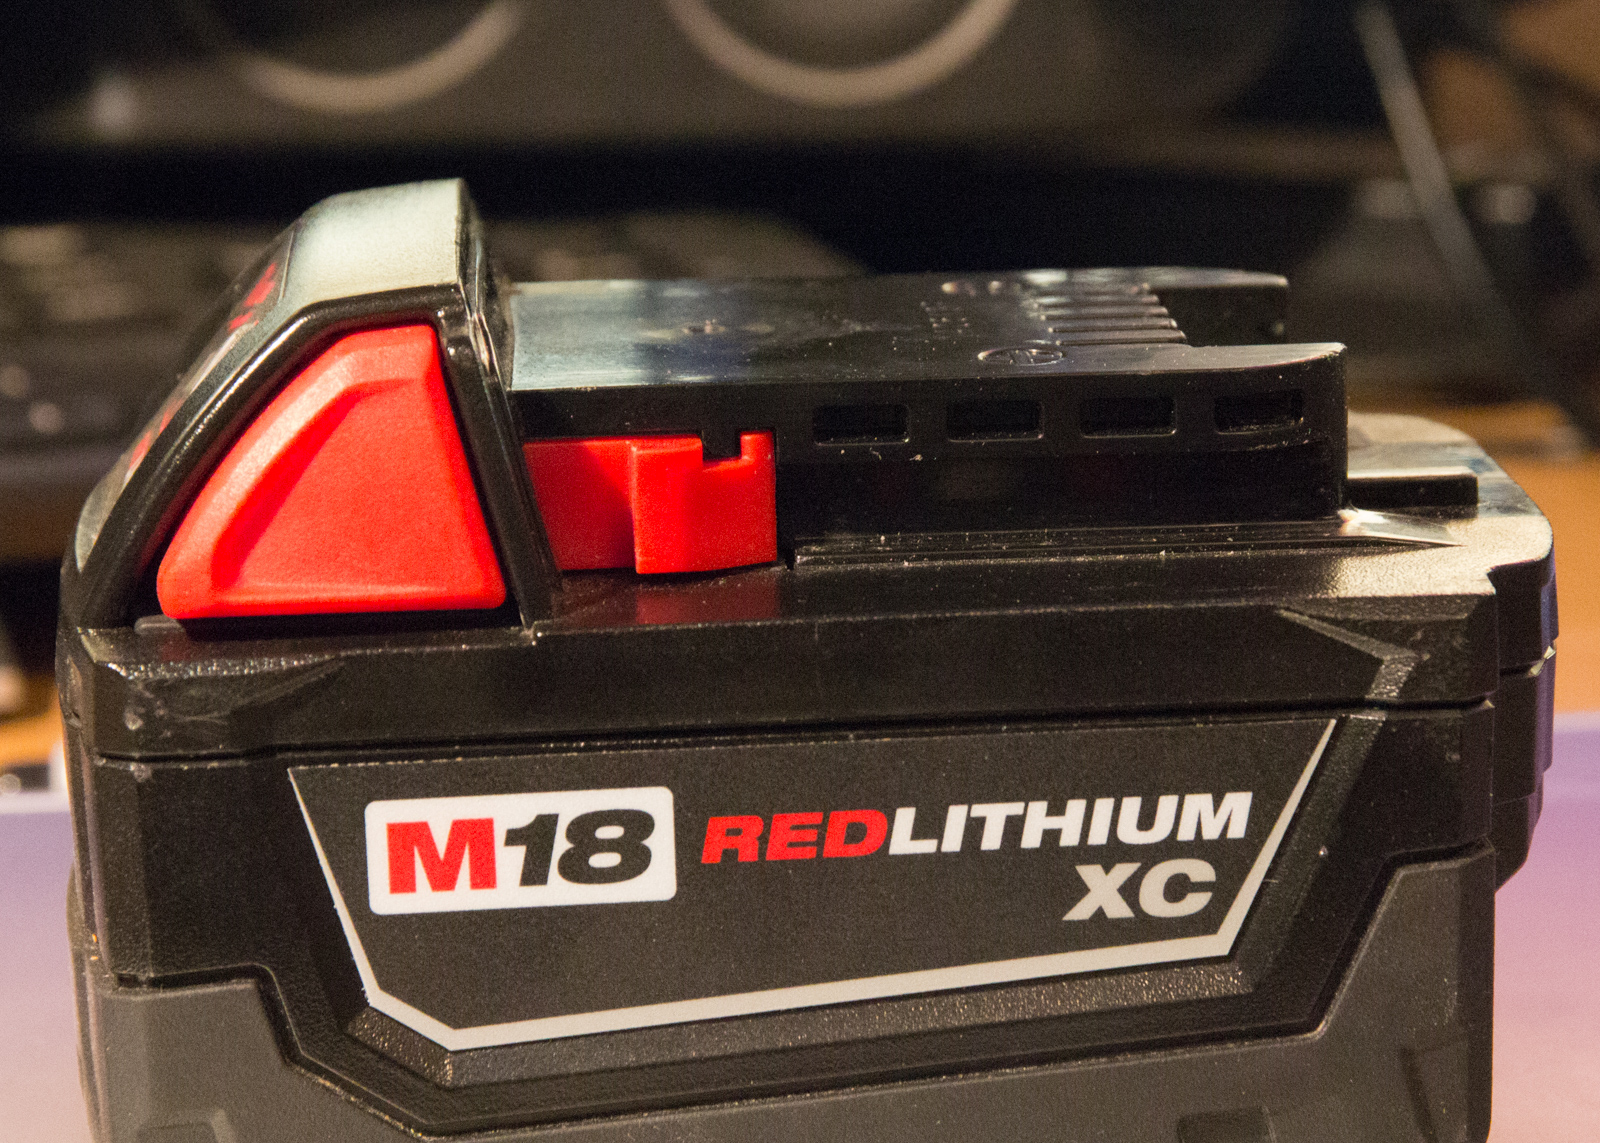
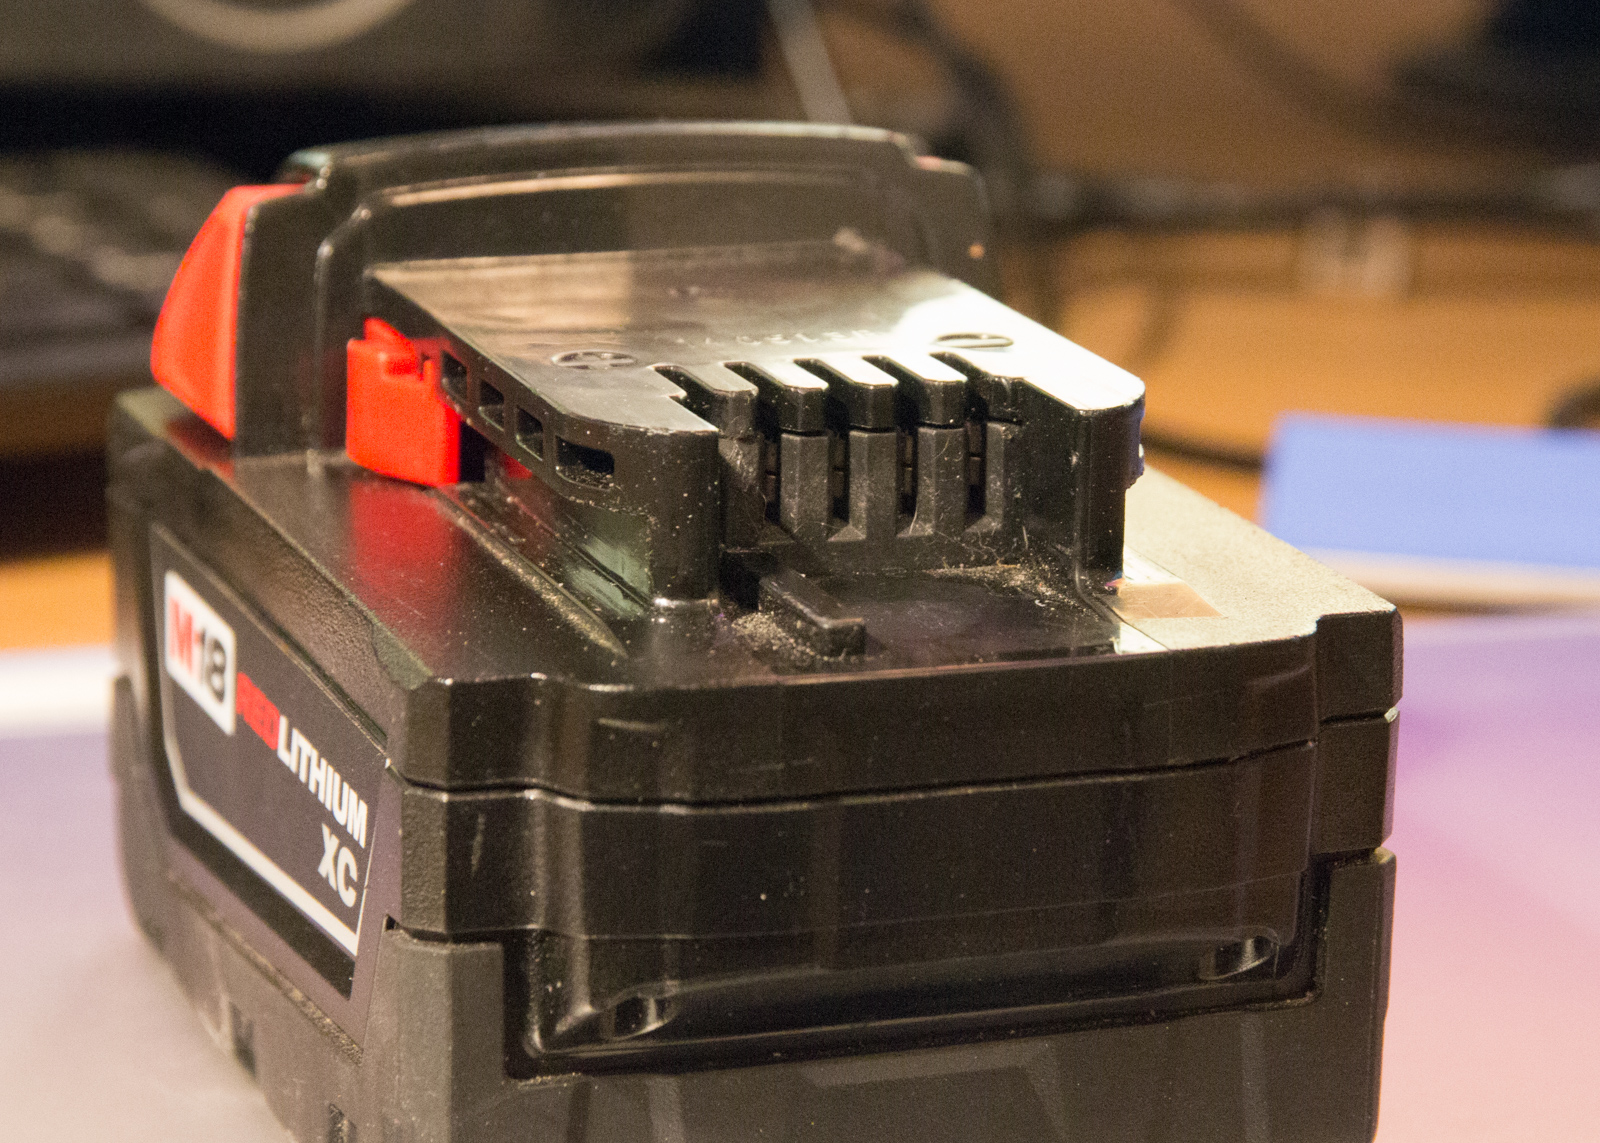
I have a few of these Milwaukee batteries around, and they are pretty good stuff. 54 Watt-hours in this specimen, 72 Watt-hours in another, that’s enough lithium stored ion fairy magic to do something serious. By comparison, my previous generation DeWalt power tool batteries were only in the 20-30 Watt-hour (Wh) ballpark.

There are lots of applications where I could use a good battery, bike lights, powering small electric DC motors, recharging my cell phone after too many hours watching YouTube videos, jump starting my motorcycle(s) every spring because I forgot to plug them into the battery maintainers…  Lots! Milwaukee is obviously hip to this concept, as they sell a “Power Port” with a built-in inverter that snaps onto one of these M18 batteries and supplies a 5V USB port. There are a damn lot of cell phone charges in a 72Wh battery. Typical high capacity smartphone batteries are in the 10Wh ballpark. See also: Why Watt-hours

A few years ago I did a fair bit of work for a Rapid City company named B9Creations. They sell a 3D printer very popular among jewelers. As a result of that work, I learned enough about the competing 3D printing technologies to make what I felt would be an informed purchase decision, the ability to realistically weigh initial purchase price, consumable price, time spent on maintenance and configuration, print speed, build volume, etc. B9 sells a great product and if you can reasonably incorporate 3D printing into your job then you should probably consider buying one. SLA is rad. In my case, any 3D printer is going to sit next to my $49 InkJet (Ok, ok, $299 LaserJet) and very likely not get used at all once the novelty wears off. How much is the novelty worth? Not. Very. Much. That LaserJet is a bit of a novelty, the $49 InkJet would have been OK — so I guess if we do the math, the novelty is worth less than $300. My standards weren’t exactly that low, though, 100 micron build resolution? Yeah, that seems like a MINIMUM standard. 100mm/sec build speed? Again, minimal. The idea of it taking a full 24+ hours to build large/complex parts makes me roll my eyes and lose interest in a hurry.

Six months ago or so I stumbled across the Monoprice line of 3D printers. If you are unfamiliar with Monoprice, their business model is interesting and seems to fill a niche. They buy a bunch of something in a common specification, sell it at a very good price, and provide a reasonable level of service/support. So 1 option, not 37. No fancy packaging. Not straight from overseas so I can easily return it if I need to. This works for me and is a niche Amazon is also seeking to fill with products branded Amazon Basics.

For the last six months or so, I have had my eye on their V2 Mini printer, which comes in around the $200 mark, and has favorable reviews. My biggest concern was with the build volume, it’s also pretty slow. But, but.. $200! Fast forward six months, I noticed the “Maker Select Plus” model, which retails for $399 was available as a refurbished unit for a reasonable ($50) discount. I have always had good luck with refurbished equipment and am not afraid to give it a go so long as there is a reasonable length of time where I am able to return it. After deciding I could probably, maybe, possibly… justify this .. I noticed they had an “open box” version of the same model, which ostensibly is a unit that had been returned but had not gone through the refurbishment process, for $299. This printer and many other popular low-cost printers are based on an open source design. All of the parts are exposed, replacement parts are easy to source, and any problems shouldn’t be rocket science to diagnose. Bottom line: I can fix it or return it if it comes out of the box broken. Ok — fine. Printer ordered for $299.99, $0.01 below my novelty purchase threshold.

There is not TOO much to say about the unboxing and assembly, you can find that review somewhere else I am sure, but I will detail what was notable. The printer I received had obviously run some material through the nozzle but the build platform did not look used. Overall it was well packaged and was easily assembled. My problems began almost immediately after assembly, though. In total, I ended up with several hours into debugging, which is no big deal and I am still happy with my purchase. It’s hard to put the issues I ran into in context, to a person familiar with 3D printers or other multi-axis CNC equipment they may have diagnosed and fixed similar issues in ten minutes. Most people probably would have returned the printer out of frustration. The printer auto-homes at startup to sort of figure out what’s what and where everything is. I thought nothing of this auto-homing procedure to start, as I assumed any limit values for the three axis’s, axes, plural axe, would be hard coded in firmware somewhere, or something. This was ostensibly confirmed as there was a setting for the start positions of x, y, and z accessible via the touch-screen menu. After startup, it was nearly impossible to calibrate the build platform to get it perfectly level. The machine was also slightly bent from the prior owner trying to get this calibration done — fortunately not bent in a way to compromises the machine in any way, just gives it character aesthetically. After dinking around for a couple of hours I got it mostly sorted out, or so I thought. Then I noticed the quality of the first few layers of my part seemed to vary if the machine had been turned off and back on in-between prints. The only difference that would make is if the auto-home process was affecting something. One thing I found weird about the machine from the start, was the auto-home for the Z axis would touch down at a spot off the build platform, it was touching down on the bolt head used to secure the heated platform down, not on the print surface. I did not know if this was right or wrong, it just seemed odd. As it turns out, it was wrong. Depending on where it touched down on this rounded bolt head, it would throw off the first layers, or not. Dead in the center of the bolt head and my adjustment held, just slightly off center and everything was a mess. It all suddenly made sense. The build platform was moving too far during the auto-home process, and the machine was setting up configuration values based on where it stopped in this process. I adjusted the Y axis limit switch so the build table would stop slightly further toward the front of the printer. This resulted in the extruder always touching down on the actual build surface during auto-home. Boom. Easy to calibrate. Calibration held every time. Off to the races. I haven’t verified this is how the printer actually works in reality, for what it’s worth, I’m mostly just pulling all of this out of my rear. Tell me I’m full of it, I’ll probably believe you.

So I’m printing test prints downloaded from the internet. That’s cool, except there are a few million models I can download from all manner of different websites and they are all utter rubbish. Toys, novelties, trinkets. Mostly just trash though, really. The only ready-to-print models I have found so far that I expect to be useful are replacement parts for the printer… (Yeah, OK, so there’s a Milwaukee battery mount model out there already, but that’s beside the point)

On to the project at hand! Using these Milwaukee batteries for stuff other than making power tools spin! Shit. I’m back to needing a 3D model.

I spent a few days playing with various pieces of software. Some free, some not. Fusion 360 seems pretty capable for the price. I can see why TinkerCAD is popular, it is in fact quite easy to pull off basic things. I watched a bunch of videos. Lots. So many videos. I tried quite a few different things. I started to get the hang of it. Started being the key word. I sort of started getting my brain wrapped around this concept that I could draw things, and then apply fixed constraints to different pieces to make my imprecise drawings precise. Still, it all felt quite imprecise and clumsy. At this point, I knew one of the primitive operations the CAD platforms are all capable of doing is “extruding” a 2D shape into a 3D object. I couldn’t help but think about how much easier it would be to programmatically generate a vector, then import it into the CAD package to extrude it into a 3D shape. After years of tackling problems with algorithms, it was more natural to think about solving things this way. In programming we are often conceptually thinking about three dimensions, often times multiple three-dimensional data structures in addition to how the data structures interact with one another. Conceptually, this 3D modeling thing was easy. There I sat, though, in a GUI-driven CAD package able to model in my mind exactly what I wanted to do and how I should be able to go about it and unable to express that through the GUI. Frustrated. Tired. The novelty was wearing off quickly.

I didn’t want to give up, not this time, so I started looking at how I could script CAD tools to do some of what I wanted, programmatically, while I continued to learn the interface. Yep, in retrospect I was basically a rat in the bottom of a flushing toilet gasping for air, I had a lawn to mow and a room to paint and laundry to do and bills to pay, there was no time for this point-and-clickery.

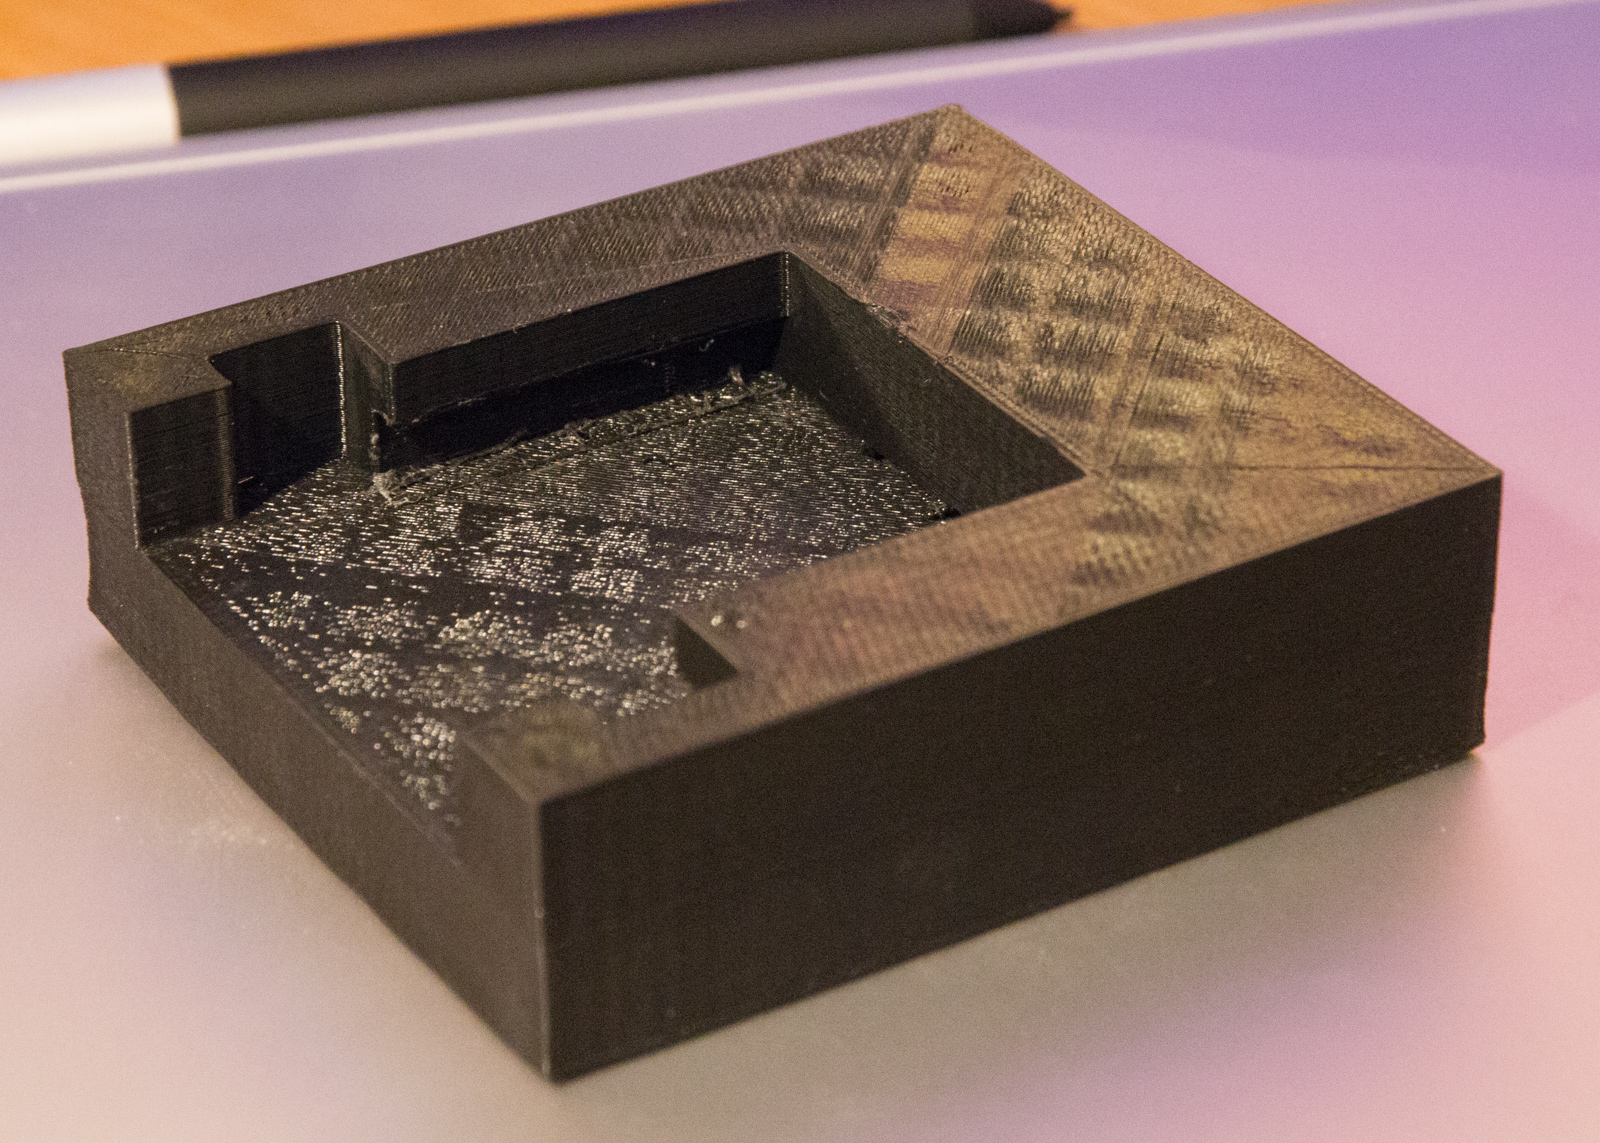
Then I stumbled on Blender and its ability to be scripted with Python, OpenSCAD, and most interesting to me, OpenJSCAD. I almost didn’t pursue learning any of these tools. It seemed like the GUI-based modeling software/method is what everyone used, and perhaps these tools were just fringe software stacks of questionable quality. I watched more videos, I spent more time pointing and clicking. It still wasn’t clicking, though. Not having printed anything of my own creation yet, I finally broke down and sat down with an OpenJSCAD instance in one tab, the documentation in another, and a Milwaukee battery and digital caliper in my lap. I started taking measurements, I started creating shapes. I started merging shapes and subtracting them from one another. I made a whole bunch of mistakes, the code was a mess, I put the battery clips in the wrong place, I used the wrong units. I had a model though.

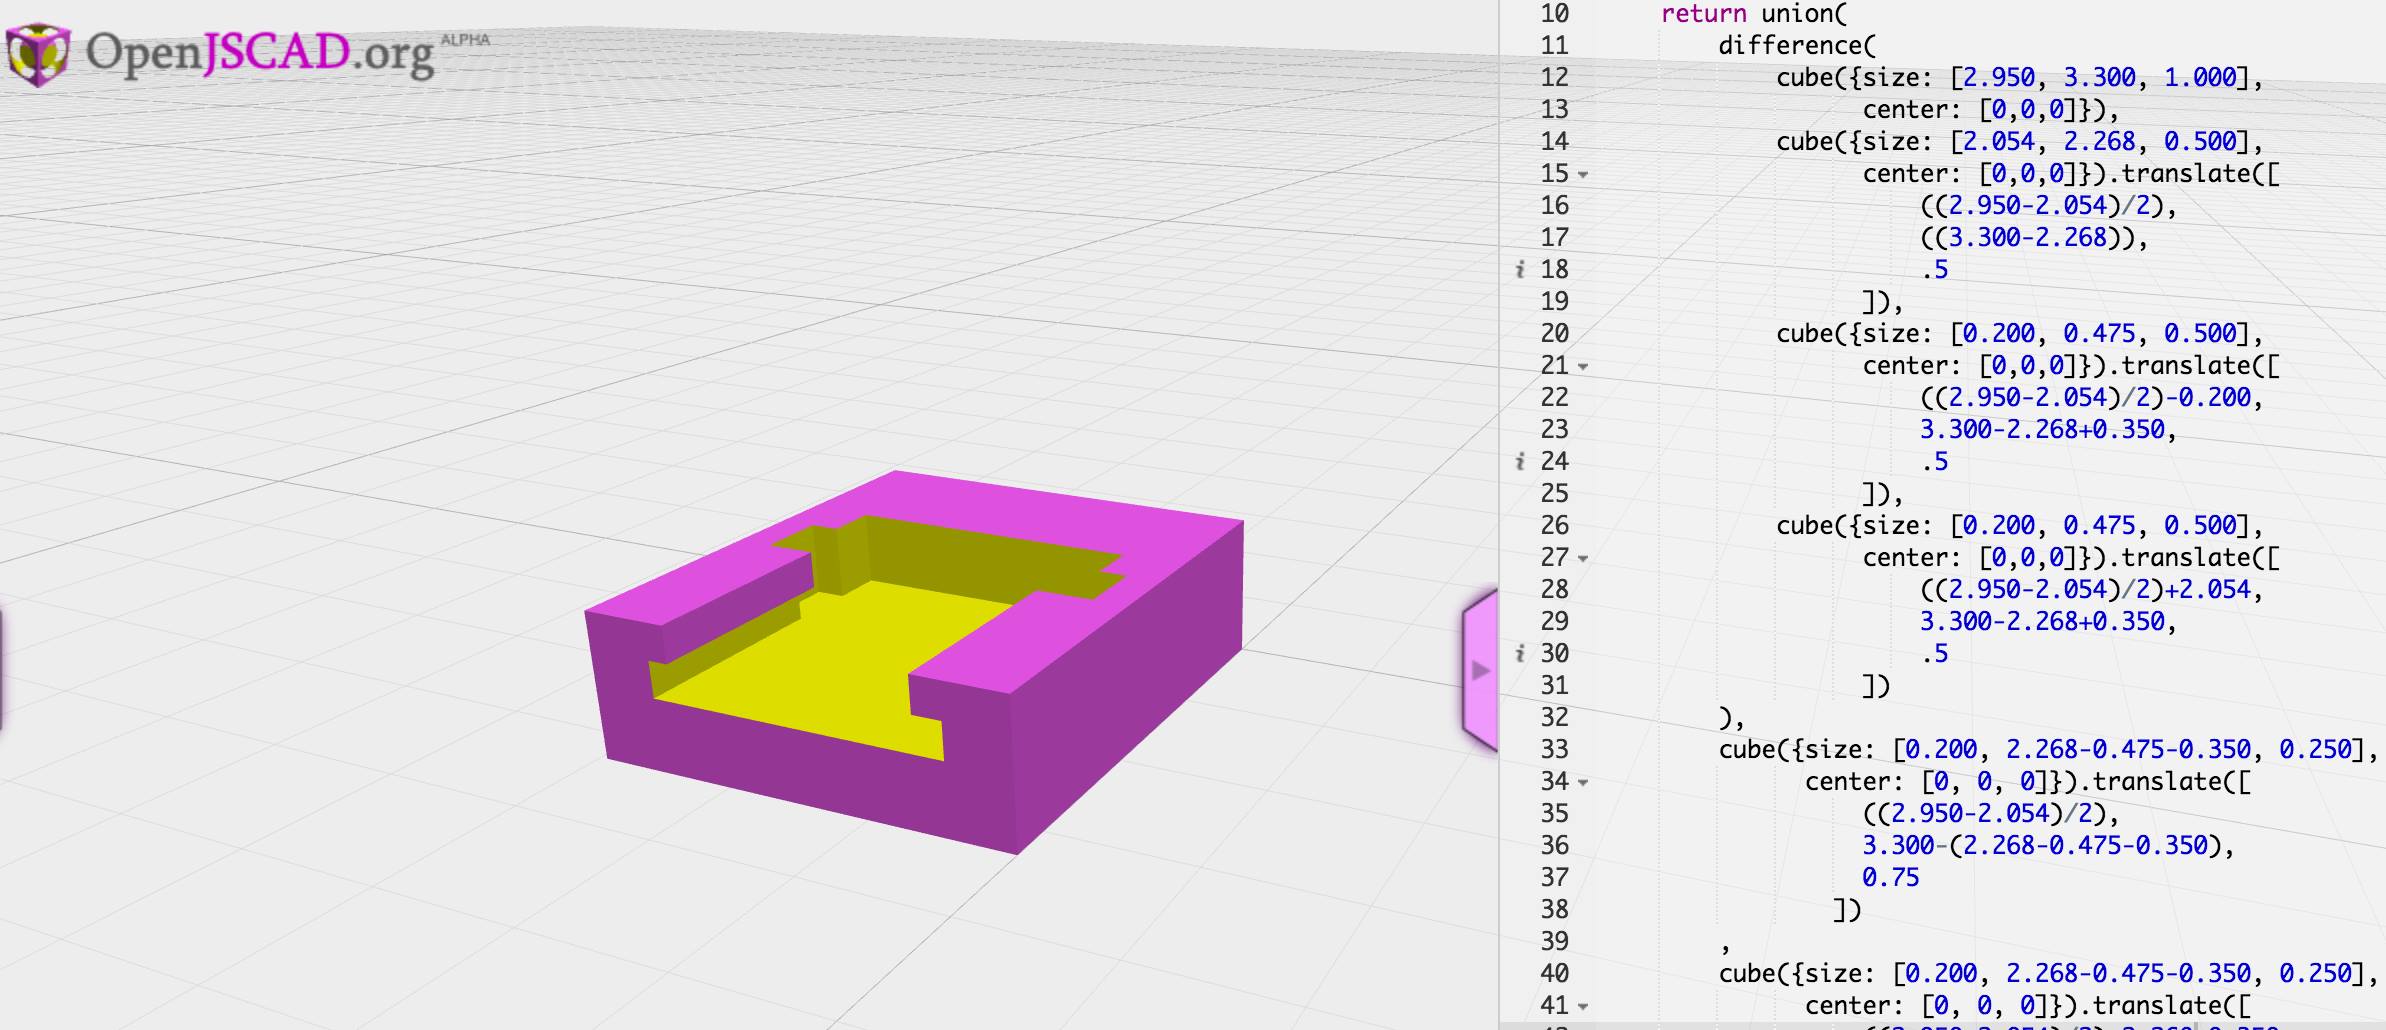
I slept on it, made some tweaks, and printed it to validate whether or not I could even slide a battery in and out. I was completely ignoring the electrical connections at this point. It printed, my battery didn’t fit. Easy to see why not though, I did another iteration. Printed, the battery still didn’t fit — but darn close! Iteration three, after learning about hull operations and how to radius things and…  the model looks a lot better AND THE DAMN BATTERY FITS. I have printed 7 of these now, each with various tweaks that have been an improvement on the prior.

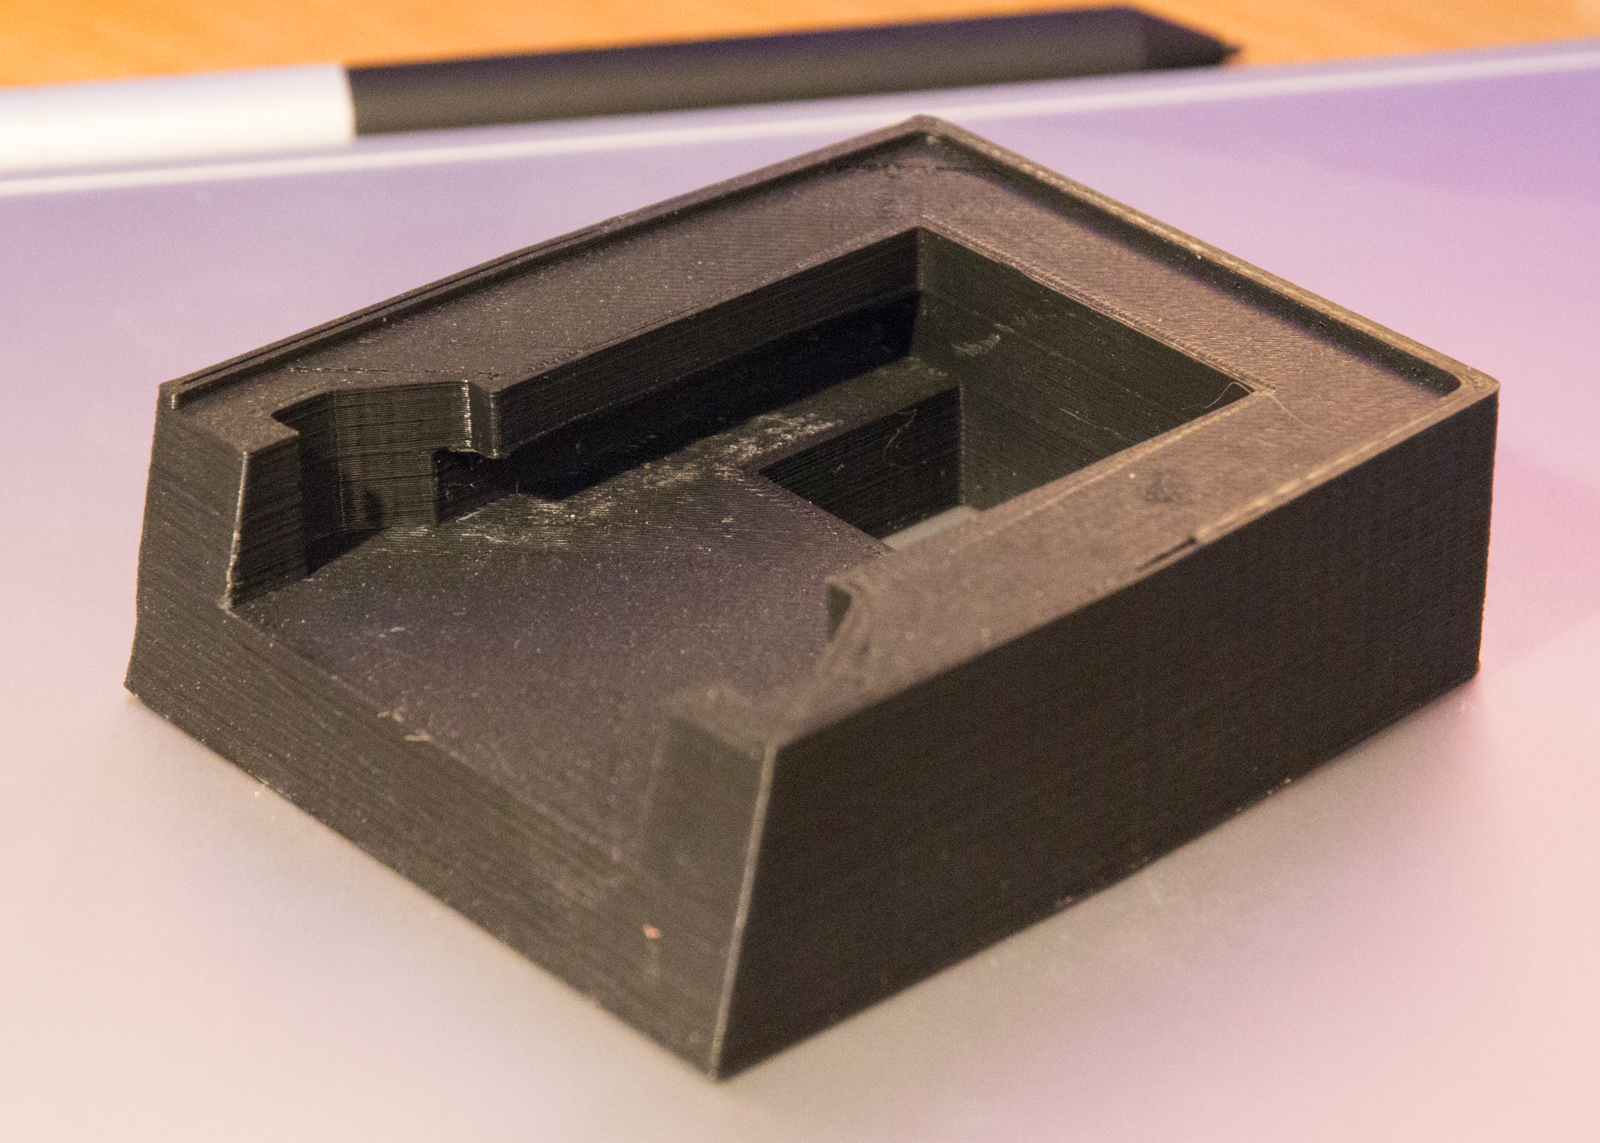
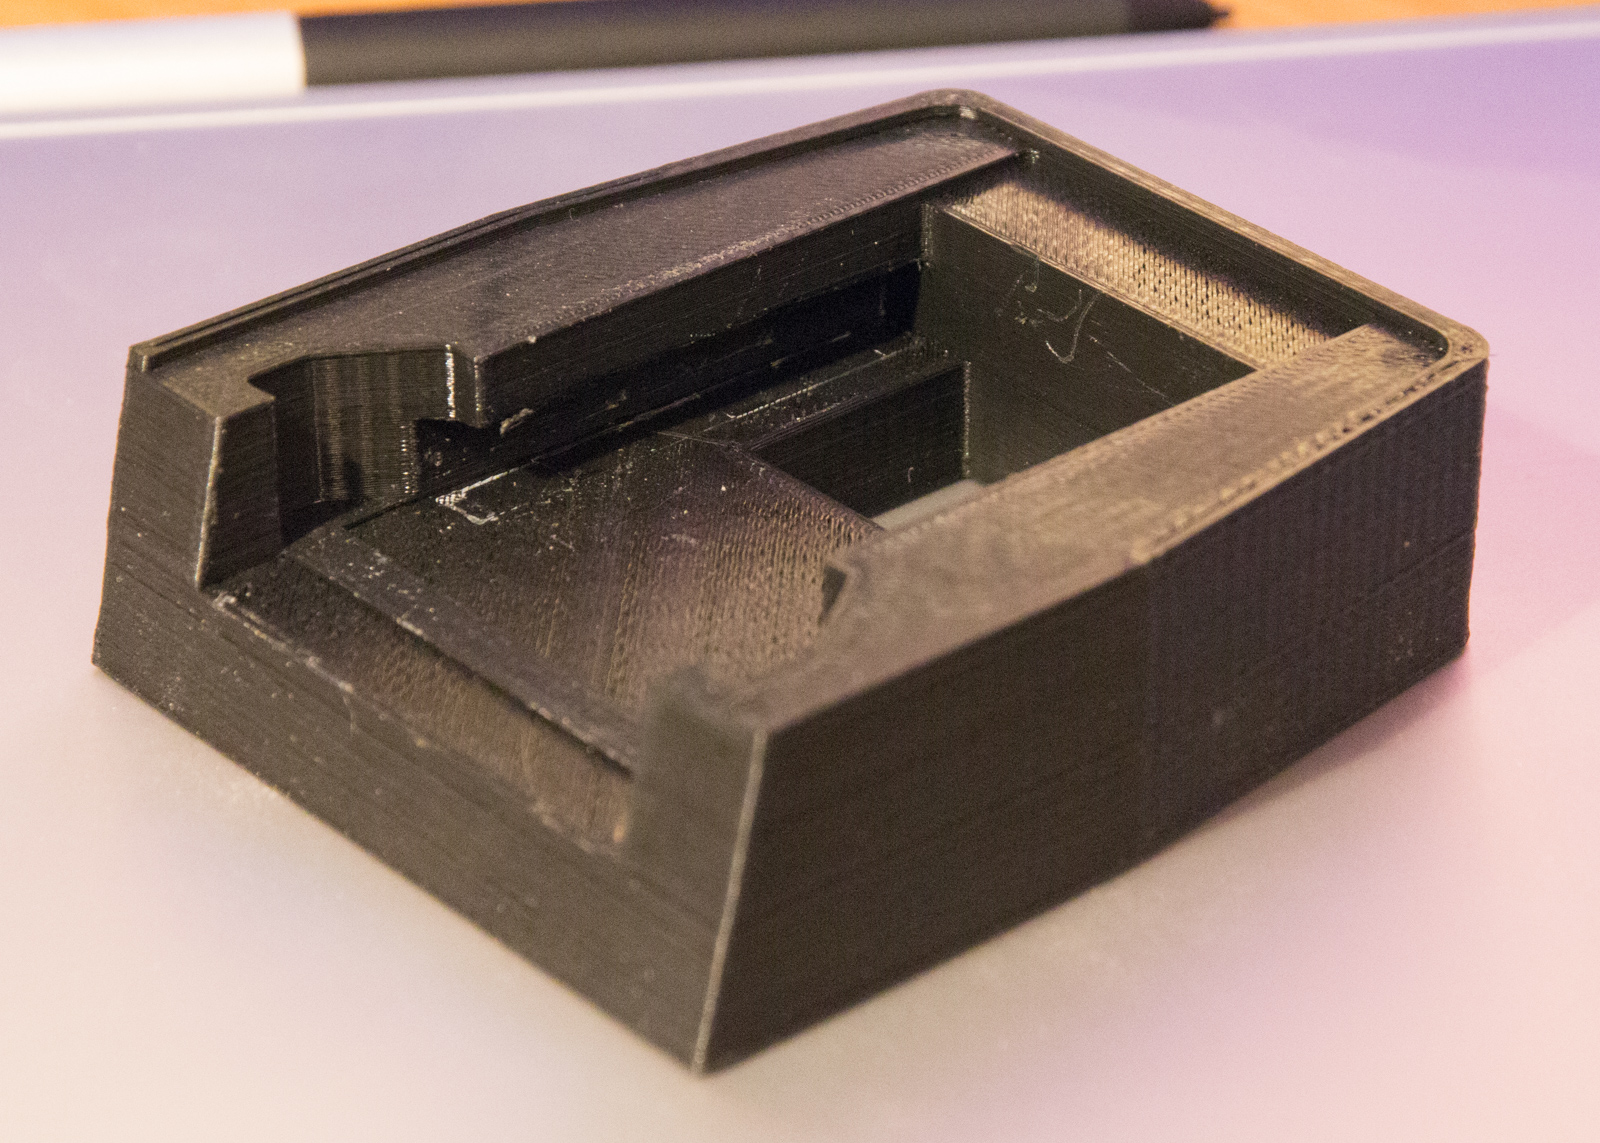
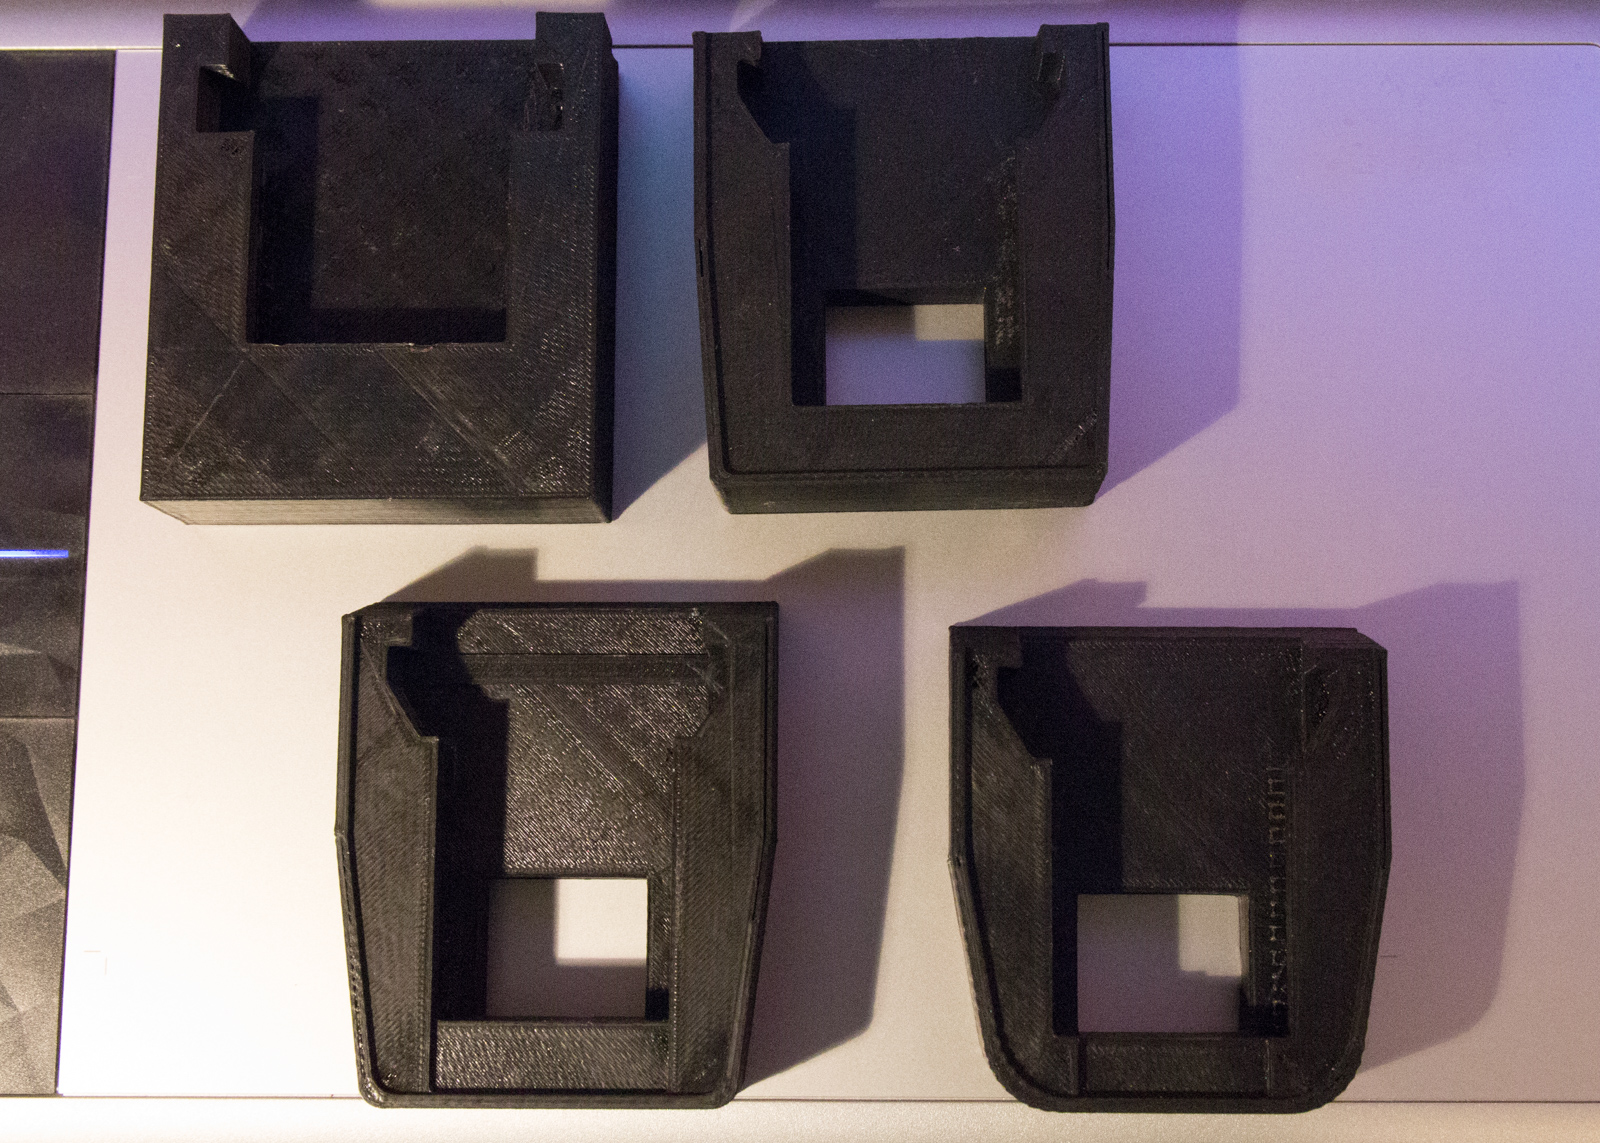
The most recent iteration (not shown) has electrical connectors and is fully functional. I have been quite impressed by the structural rigidity, strength, and light weight of the finished printed parts. You aren’t going to build passenger planes or rockets that can go to space with these parts, but for coming out of what is essentially a really precise hot glue gun they are amazing. Print #4 weighs 29 grams. It was printed with Monoprice PLA+ filament that was $19.99 for a 1kg spool. Material cost for this print? $0.58. Print time? About two hours. Would I trust it to hold onto my 1.5lb battery while it was repeatedly subjected to 3-4g’s? Yeah. Probably. It’s a functional part.

It has now been 1 month since I ordered the printer. OpenSCAD and OpenJSCAD have proven to be very rich environments for creating models. I find I am only limited by my ability to adequately express myself in code. This is the same limiting factor (mental leap) I found in GUI-based tools as well, but with the programmatic interface, I am able to bring my experience to bear on the problem. Sometimes my solutions lack elegance, but I can make it do what I want!

Developer? Want to model parts in 3D? Don’t do the clicky. Do what you do.

Tracking MachForm form submissions with Google Analytics

machform-trackMachForm (self hosted) is a great tool for managing many different types of user submissions from visitors to your website. While WordPress has a great form option in Gravity Forms, MachForm is platform agnostic and has a number of integration options allowing it to coexist fairly well with almost any LAMP-based web deployment.

Since version 4 MachForm has allowed for loading of a Custom Javascript File, configurable on a per-form basis. This provides an excellent facility to track form submissions in Google Analytics. These events can then be used to create goals, etc.

This is actually perhaps easier than it sounds, the first step is adding the Google Analytics embed code for the website to a file (assuming you are using the default iframe embed mode of MachForm), without the line for tracking a pageview. Since MachForm uses jQuery internally, we can use jQuery here to attach events to the form that will submit our Google Analytics event when the form is submitted. The portion of the code that extracts the title of the form may be different depending on the MachForm version, MachForm theme chose, or etc.

(function(i,s,o,g,r,a,m){i['GoogleAnalyticsObject']=r;i[r]=i[r]||function(){
        (i[r].q=i[r].q||[]).push(arguments)},i[r].l=1*new Date();a=s.createElement(o),
    m=s.getElementsByTagName(o)[0];a.async=1;a.src=g;m.parentNode.insertBefore(a,m)
})(window,document,'script','//www.google-analytics.com/analytics.js','ga');

ga('create', 'UA-XXXXXXXXX-1', 'auto');

$(document).ready(function(){
    $('#submit_form').click(function(e){
        var title = $('#form_container > h1 > a').html();
        ga('send', 'event', 'form', 'submit', title);

        var form = this.closest('form');
        e.preventDefault();
        setTimeout(function(){
            form.submit();
        }, 500);
    });
});

Once this JavaScript is saved to a file and uploaded to your server, add the path to under Advanced Options for all the forms you wish to track and you are off to the races.

Magento Integer based SQL injection vulnerability in product parameter

Recently I was asked to look into a potential PCI compliance issue in Magento 1.7/1.8/1.9. The potential issue was uncovered by ControlScan. The summary was as follows:

Integer based SQL injection vulnerability in product parameter to /checkout/cart/add/uenc/<snip>,/product/<id>/
 
Risk: High (3)
Port: 80/tcp
Protocol: tcp
Threat ID: web_prog_sql_integer

Upon diving into the additional supplied information, it was almost immediately clear what the test was doing. It was performing a POST request against the URL: /checkout/cart/add/uenc/<snip>,/product/XYZ/
XYZ translates to a valid Magento product id. In the payload (POST’d multipart/form-data) that would get parsed into the PHP $_POST superglobal, an initial request passed product=XYZ, and a subsequent request passed product=XYZ-2.

The scan saw the same output returned for each request, and thus assumed the cart might be getting “duped” by the invalid XYZ-2.

Let’s take a look at the code which handles this submission (which is an AJAX style action that adds a product to the cart). It is located in app/code/core/Mage/Checkout/controllers/CartController.php, starting around line 170, in the addAction public method. The take-away here is the $params variable setup in addAction, as well as the product id discovery in _initProduct both retrieve their data by calling $this->getRequest()->getParams(); — this parameter data comes from any number of places, including the URL, GET, or POST. In this instance, the product variable is being parsed out of the URL, and the product supplied via POST is never referenced. No wonder the output was the same, the URL was the same in both cases, the modified POST data was never a factor.

If you simply want to tighten up your cart to get it to pass your PCI compliance scan, the following code will do that for you, just replace the top part of addAction with the following, and be prepared for an eventual upgrade to undo this patch.

public function addAction()
{
    $cart   = $this->_getCart();
    $params = $this->getRequest()->getParams();

    $postInput = file_get_contents("php://input");
    $postStrDataArr = explode("\n", $postInput);
    $postStrData = array_pop($postStrDataArr);
    parse_str($postStrData, $postData);

        if ((isset($postData['product']) && $postData['product'] != $params['product']) || !is_numeric($params['product']))
        throw new Exception('Invalid Product ID');

    try {

This modification compares the parameter parsed via the URL with the parameter passed via POST and throws an Exception if the two do not match.

No doubt there is a better and more Magento-esque way to remedy this issue, but the above will work in a pinch.

Generalized string search improvement for needles with a small or numerically similar alphabet

I have been on a bit of a pointless optimization kick lately, and decided to see what I could do with string search. Most of the fast string search algorithms work on the principle of a sliding window for the purpose of skipping characters which don’t need to be checked. The best of these use a fair (fair being relative) amount of storage and extra cycles in the loop to make sure they are skipping as many characters as possible.

I am sure this has been done before, but I haven’t seen it. In the code below I have implemented an unintrusive extra level of skips to the well known Boyer-Moore-Horspool algorithm. Basically, each character of the key is AND’ed together and the result stored. If the result is zero, which happens if the alphabet is large/sparse enough, the extra checks are conditionalized away. In the event that the result is non-zero, we very quickly check for mismatches in the haystack by AND’ing the haystack character being checked against our previous result, and checking to see if the result of that is equal to our previous result. If the two results are equal, we have just checked a potentially matching character, and we need to fall back to our regular checking routine. In some cases we will match a non-matching character and our efforts will have been wasted, but in other cases we will have determined a non-match and be able to skip the full length of the needle in just a few instructions.

Original source for Boyer-Moore-Horspool lifted from Wikipedia.

boyer-moore-horspool.c
boyer-moore-horspool-sjg.c

Below are some quickie results from my X3220, compiled with GCC 4.2.1.


$ gcc -O2 boyer-moore-horspool.c -o boyer-moore-horspool
$ gcc -O2 boyer-moore-horspool-sjg.c -o boyer-moore-horspool-sjg
$ time ./boyer-moore-horspool
61
28
16
./boyer-moore-horspool 5.53s user 0.00s system 99% cpu 5.530 total
$ time ./boyer-moore-horspool-sjg
61
28
16
./boyer-moore-horspool-sjg 5.21s user 0.00s system 99% cpu 5.210 total

$ gcc -O3 -mtune=nocona boyer-moore-horspool.c -o boyer-moore-horspool
$ gcc -O3 -mtune=nocona boyer-moore-horspool-sjg.c -o boyer-moore-horspool-sjg
$ time ./boyer-moore-horspool
61
28
16
./boyer-moore-horspool 5.28s user 0.00s system 99% cpu 5.282 total
$ time ./boyer-moore-horspool-sjg
61
28
16
./boyer-moore-horspool-sjg 5.02s user 0.01s system 99% cpu 5.034 total

The, dare I say “elegant”, thing about this addition is that it could relatively easily be applied to many other string search algorithms and completely conditionalized away from the inner loop if the results are going to be ineffectual.

Virtual machine opcode dispatch experimentation

I was reading The case for virtual register machines recently and decided to do a bit of experimentation with different opcode dispatch methods. Apparently, up to 60% of the cpu time burned by common virtual machines is due to branch mispredicts. This is rather a silly problem to have in the context of opcode dispatch, considering the VM knows quite readily exactly where it will be branching to for each VM instruction. As a result, there is really no reason for the mispredicts apart from the fact that we can’t actually tell the cpu what we know. Since there is no useful mechanism of any sort (at least on all x86 cpu’s that I know of) to say to the cpu, branch at foo will go to bar (short of JIT’ing everything, which can indirectly solve the branch mispredicts which happen at the opcode dispatch stage), the best we can really hope to do is attempt to seed the branch predictor with past branch information that will hopefully prove useful in the future. This proves to be somewhat problematic, as different cpu’s have branch predictors implemented in different ways and with different capabilities, and varying mispredict penalties. You also tend to burn cycles and space over more direct implementations, you just have to find the algorithm that lets you come out ahead due to increased prediction accuracy.

To really figure out what is going to work best for a full blown VM, I think you need to start at the beginning. The paper above referenced a couple of different ways that opcode dispatch is typically accomplished, but I wanted to write my own test cases and figure out exactly what would work the best, and more importantly, what definitely was not going to work, so that I could avoid wasting time on it in the future. These are more important simply because the faster running algorithms will very likely be somewhat dependent on the number of opcodes a VM implements and the frequency with which it executes opcodes repeatedly or in the same order.

My preliminary test cases are on github here: http://github.com/evilsjg/hacks/tree/master/troa/test/dispatch, and the runtime results with various compilers on various CPU’s is here: http://github.com/evilsjg/hacks/tree/master/troa/test/dispatch/RESULTS.

As you can see, the “goto direct” version is the fastest in every case by a relatively healthy margin. To qualify these results I implemented the same method of dispatch as the goto direct case in the Lua VM. Much to my dismay it was consistently (~10%) slower than the switch-based dispatch that is standard in Lua. After quickly realizing it was purely a function of opcode count, 5 in my tests vs 38 in Lua, I modified my Lua patch to be more like the goto direct 2 example. Runtimes are not provided in the RESULTS file for this, but it was marginally slower than the goto direct case. After this, Lua was consistently faster (up to around 30%) on some of my test hardware, and marginally slower on others. Making minor changes to the breadth or depth of the nested if or switch statements expanded into each opcode had minor changes one way or the other on all processors tested. Typically, faster on my Xeon 3220 meant slower on my Athlon XP 2500+, and vice versa, but by differing magnitudes. The Xeon gets faster, faster than the Athlon slows.

The entry point to my post about this on the Lua list can be found here.

There is obviously performance to be had here, probably quite a bit of performance. My next bit of testing will focus on expanded (# of opcodes) versions of the faster test cases, with more realistic opcode distribution. In terms of algorithmic improvements, I am going to try grouping opcodes in various ways adding the group identifier to the opcode itself, so that the dispatch data structures can nest like switch (group) { case n: switch (op) { } * n }. I am also going to play with the concept of simple opcode or group ordering rules. The compiler frontend of any VM follows some set of rules, intended or not for generating the opcodes that the VM executes. Even with a VM implementation that does not enforce those rules, and allows opcode execution in any order, knowing the likely order will no doubt be useful for optimization.

A requirement in my mind early on for the TROA VM was the easy evaluation of expressions on vectors or streams in the language to make extensive use of SIMD possible inside the VM. This concept is being weighted right up to the top of my list after having done this opcode dispatch testing. Even in the basic unoptimized case where your opcode operates on its vector/stream serially, there is still potential for double-digit overall program performance improvement due to the reduction in opcode dispatches.

A Better IE 5.5 and 6 PNG Fix

I should have posted this here prior to now, but as you can probably tell … .. I don’t post to this blog very often. During the implementation of the new flixn.com site we decided to use PNG alpha transparency to some extent. During the course of implementation existing IE5.5/6 PNG hacks were deemed to be wholly inadequate for our needs. So, I took some time to reimplement the core PNG hack as an .htc (IE CSS Behavior) and layer in some additional hacks on top to support css repeat and positioning.

Get the code: [HERE]

Original post follows:

So there I was in the wake of an unexpected and tragic steamroller accident involving the entirety of the production design staff… “Wait, you mean I have to cut and implement all the new Flixn.com designs? Me? Well, ok, this shouldn’t be too hard. I’ll just slice each element out with alpha transparency preserved in PNG’s, then layer them using CSS just like they are in Photoshop.”

“Wait, wait. What do you mean that won’t work?”

Back in reality, the lack of true support for PNG alpha transparency in Internet Explorer 5.5 and 6 has been nipping at us and many others for at least 4 or 5 years now. Given that browsers that are fully supporting are in the 70%+ market share range, we decided that it was time to come up with a proper “fix” that would allow our alpha transparent PNG’s to degrade gracefully on now effectively “legacy” versions of IE.

Many web developers out there will be familiar with the prevalent “.htc” file behavior fix targeted at this problem. There are certainly other ways to approach a solution, but we tend to like this one for a number of reasons, perhaps the biggest being: It will invalidate otherwise valid CSS. This may seem a bit crazy, but a fix (hack) is a fix (hack) and as a boundary pushing web developer, one probably shouldn’t be left to forget that.

The IE behavior/.htc fix that has been around for a number of years has some pretty staggering limitations when used on anything resembling a complex layout – so staggering, in fact, that it’s easier to just say what it gets right: images in img tags, and non-repeating (non-tiled) background images aligned to the top left of their container. Perhaps this isn’t a problem if you design the page with this in mind, but it certainly won’t suffice in making a crazy-alpha-png’d-layout degrade gracefully on IE 5.5/6.

For our from-scratch implementation, we started with a page cut and structured as we desired and validated the presentation in IE7, Firefox2+ and Safari 3+, then implemented our own behavior/htc hack to correct all the regressions that we could find in earlier versions of IE. What we ended up with was something that was capable of not only preserving the status-quo in IE PNG hacks. We also bring to the table full support for the CSS properties background-position (for labeled, pixel and percentage offsets) and background-repeat (for values of repeat, no-repeat, repeat-x and repeat-y). The only thing we don’t do is support the use of these two properties together. We’ll leave that for someone else… or maybe a future weekend hacking session.

PowerDNS / PostgreSQL & Web Interfaces 2

After a bit of eat and drink, as well as a half hour of zOMG why is this not werking!?!?! (iptables), Supermaster/Superslave is operating famously. It seems to “just work”. No complaints thus far, which is, well… highly unusual for me to put it lightly.


Feb 03 05:35:55 Received NOTIFY for flixn.com from 72.232.239.130 for which we are not authoritative
Feb 03 05:35:55 Created new slave zone 'flixn.com' from supermaster 72.232.239.130, queued axfr
Feb 03 05:35:55 gpgsql Connection succesful
Feb 03 05:35:55 No serial for 'flixn.com' found - zone is missing?
Feb 03 05:35:55 AXFR started for 'flixn.com', transaction started
Feb 03 05:35:55 AXFR done for 'flixn.com', zone committed

PowerDNS / PostgreSQL & Web Interfaces

http://evilcode.net/sjg/infernal/PowerDNS/SCHEMA/

I have been looking at PowerDNS for a while now, and after regular confirmation that it is in fact performing extremely admirably over at DreamHost I decided that it was time to deploy it.

While PowerDNS is the least braindead DNS server I have ever come across, there were a couple of things that I was not 100% happy with, at least in terms of coupling it to a web frontend.

  • SOA records are stored space-delimited. This would hardly be a problem except that our serial is stored here. In its defense, PowerDNS has an alternate method of handling serials that is probably better in most circumstances. Hardly, but we would still have to break it apart and put it back together again to edit the minimum (default in practice) TTL, etc.
  • Record types are stored textually. Even when implemented as an enumerated value this still violates DRY, as you must re-state these values in your frontend code.
  • Everything must be represented fully qualified. This = FAIL from a normalization perspective.

Here I have come up with a somewhat optimal schema from the point of view of my web interface, and I have tied it to PowerDNS’s preferred table structure via domain logic. This could have been handled in other ways of course, but I tend to like this one for a number of reasons.

  • First, the alternative is to add custom queries to the PowerDNS configuration file to make it understand whatever schema we might have in place, PowerDNS actually makes this very easy.
  • Another alternative would be to use dynamic (normal) views.

On to the benefits, some being quite minor.

  • Querying against serialized views will have performance benefits versus the above two options, this of course has to be weighed against the cost of maintaining the views.
  • As mentioned, PowerDNS has two methods of handling serials, either in the SOA record, which we are keeping up to date with our domain logic. Alternatively PowerDNS will scan each record for you to find the most recently updated (if you maintain change_date). The former should logically be more performant, so we have implemented that option. This could have been handled either way in the domain logic, but most importantly we aren’t relying on our web frontend to keep our serials up to date.
  • Most importantly, namely for debuggability, data on master’s and slave’s “looks the same”.

To get you rolling your PowerDNS configuration file need not be any more complicated than this:


launch=gpgsql
gpgsql-host=hostname
gpgsql-user=powerdns
gpgsql-password=password
gpgsql-dbname=pdnstest
daemon=yes

I haven’t tried slaving yet, but I suspect it will work without a hitch. Will update here when I do and when this rolls out.

ActionScript

This week I decided to toy with ActionScript/Flash a bit (for the first time, really). I’m using the FlashDevelop IDE, so it’s all free goodness, no shelling out $500 to Adobe. Anyway, I wrote an MP3 player that is devoid of any sort of flash user interface, completely controllable through JavaScript. It’s a mere 162 lines of ActionScript and weighs in at 2071 bytes as an swf. It supports a wide range of operations, load, play, pause, stop, setvolume, getvolume, ispaused, getpauseoffset, getcurrentfile, getduration, getposition, getbytesloaded, getbytestotal, getid3, as well as a number of asynchronous JavaScript callbacks (notifications) on various events, loadcomplete, playcomplete and id3found. You can see it in action with possibly the simplest UI possible here: http://evilcode.net/sjg/player/.

The real question that I am trying to answer for myself is, does eliminating the flash user interface somehow make it [flash] more palatable?

Introspecting PostgreSQL and MySQL, starting out

Starting at the top, PostgreSQL and MySQL have wildly different concepts of what constitutes a schemata. In MySQL information_schema is a database that can be used directly or via cross-database queries. Whereas in PostgreSQL, you cannot perform cross-database queries because you connect to a single database. Here, the information_schema is contained within what PostgreSQL calls a schema, or a seperate namespace within a database.


Common Fields (schemata):
catalog_name
PostgreSQL: Always the name of the parent database
MySQL: Always NULL
schema_name
PostgreSQL: Name of the schema
MySQL: Name of a database
default_character_set_name
PostgreSQL: Feature not available
MySQL: Default character set (utf8, latin1, etc.)

PostgreSQL:
schema_owner
User (role) that owns the schema

MySQL:
default_collation_name
Default character set collation (utf8_general_ci ...)

So, what we get out of all this is that for PostgreSQL, we connect to a database and schemata tells us what schema’s exist. In the case of MySQL, it tells us what databases exist. Of course application dependant, but in many cases you can treat these as the same thing.

Once we know all about our databases, or whether we wanted to know about them at all, the next thing we will probably want to dig into are tables.


Common Fields (tables):
table_catalog
PostgreSQL: Always the name of the parent database
MySQL: Always NULL
table_schema
PostgreSQL: Name of the schema that contains the table
MySQL: Name of the database
table_name
Name of the table
table_type
'BASE TABLE' for a regular persistent table
'VIEW' for a view
PostgreSQL: 'LOCAL TEMPORARY' for a temporary table
MySQL: 'TEMPORARY' for a temporary table

MySQL:
table_comment
Comment

To set comments on PostgreSQL tables:
COMMENT ON TABLE table_name IS 'This is a table comment';
To retrieve comments we must dig into the system information schema:
SELECT obj_description(
(SELECT c.oid FROM pg_catalog.pg_class c
WHERE c.relname='table_name'), 'pg_class')
AS comment;

Next, we’ll want to dig into information about the columns of those tables


Common Fields (tables):
table_catalog
PostgreSQL: Always the name of the parent database
MySQL: Always NULL
table_schema
PostgreSQL: Name of the schema that contains the table
MySQL: Name of the database
table_name
Name of the table
column_name
Name of the column
ordinal_position
Position of the column within the table, the ordering of the columns
column_default
Default (expression) for the column
is_nullable
Whether or not the column can be null, 'YES' or 'NO'
data_type
Name of the built-in type
PostgreSQL:
'ARRAY' - see the element_types view
'USER-DEFINED' - identified in udt_name+
If domain-based, refers to the underlying
type and the domain is identified in domain_name+
character_maximum_length
Maximum length of character data if defined, otherwise NULL
character_set_name+collation_name
MySQL: NULL if not defined

PostgreSQL:
udt_schema
Schema the user-defined type is defined in
udt_name
Name of the user-defined type

domain_schema
Schema the domain is defined in
domain_name
Name of the domain

MySQL:
column_type
More specific column type than data_type (varchar(255)
column_key
'PRI' or blank ?
column_comment
Comment

To set comments on PostgreSQL columns:
COMMENT ON COLUMN table_name.column_name IS 'This is a column comment';
To retrieve comments we must dig into the system information schema:
SELECT col_description(
(SELECT c.oid FROM pg_catalog.pg_class c
WHERE c.relname='table_name'),
(SELECT a.attnum
FROM pg_catalog.pg_class c,
pg_catalog.pg_attribute a
WHERE a.attrelid=c.oid
AND c.relname='table_name'
AND a.attname='column_name'));